

GEEK SQUAD - SHIPPING & RECEIVING
I redesigned both the physical and digital workflow for receiving repair devices at warehouse scale — replacing multiple legacy apps with one tool.



Scenario
A customer brings a device in for repair. Once it's logged, the device has to travel from the local Best Buy store to Geek Squad City — the main warehouse that handles thousands of units a day — to be received, binned, repaired, and shipped back.
Problems & Goals
Every service location ran its own aging, separate application, and the receiving flow was slow and full of redundancies. The goal was to replace these with one new, user-friendly application — Repair Workbench — that requires minimal training and saves time. This case study covers one slice of that program: shipping and receiving at Geek Squad City. The build had to ship ASAP, leaving little time for user tests, and the experience had to scale from the warehouse down to local stores handling only a few units a day.
Solution
I streamlined both the physical and digital flow. On the physical side, I moved Traveler printing upstream to the store so it ships inside the box. On the digital side, I built a full-screen scan mode and a one-scan receive-and-bin model that eliminated the constant switching between scan gun and mouse — cutting the time to receive and bin a device from 90 seconds to 30, and the interactions from nine down to three.
Responsibilities
As the Design Lead for this area, I was accountable for the entire fulfillment workstream — physical flow, digital flow, research, and every scanning pattern in the enterprise design system, which I built from scratch with the system lead. I worked directly with Product and Operations, prototyped and presented across multiple orgs, and produced the final comps, documentation, and prototypes. With no on-site access to Geek Squad City, I validated by interviewing warehouse managers, researching at an equivalent local depot, and running a usability test of the binning naming convention — so one naming system would work across all warehouses, not just GSC. I designed the MVP, then moved to the Store Inventory App before this build was coded.
Opportunity 1
Can we streamline the physical task flow to make receiving thousands of items daily faster and cheaper?

Current Physical Task Flow

We mapped the workflow across each employee's role — their physical interactions with the environment and their interactions with the system — drawing on interviews with the people who do it. Below is a high-level overview.
SCAN STATION #1
Receive & Print Paperwork
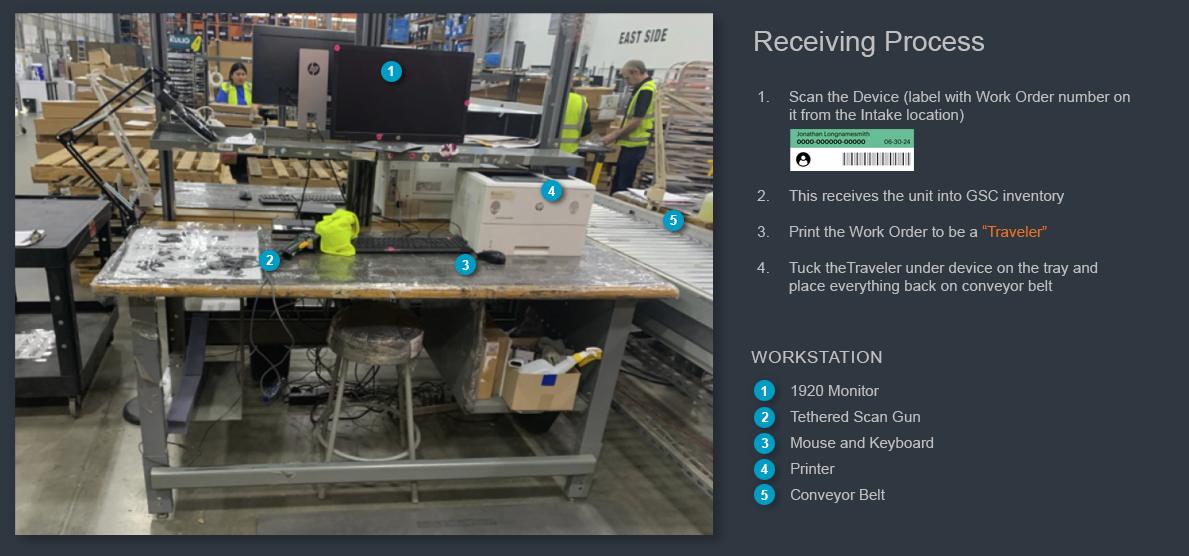
Devices are unboxed, placed on trays, and moved to the first scanning station, where two tasks happen at once: scanning the item into inventory and printing its paperwork — the "Traveler," a barcode sheet that's easier to scan than the device label as the item moves through the warehouse.
What stood out
Agents work several feet from the monitor, move around a lot, and constantly set the scan gun down to reach the mouse. These observations shaped how I designed the new scanning experience in Opportunity 2.

Continue to Scan Station #2
The printed Traveler is tucked between the device and the tray and placed on the conveyor belt to the second scanning station. There, devices are sorted and scanned onto transit carts by brand and repair type, then the carts move to the appropriate repair line for servicing.

SCAN STATION #2
Assign (Bin) to Transit Cart
The device makes it way by conveyor belt to station two. Here they bin the devices to a Transit Cart.


Solution 1
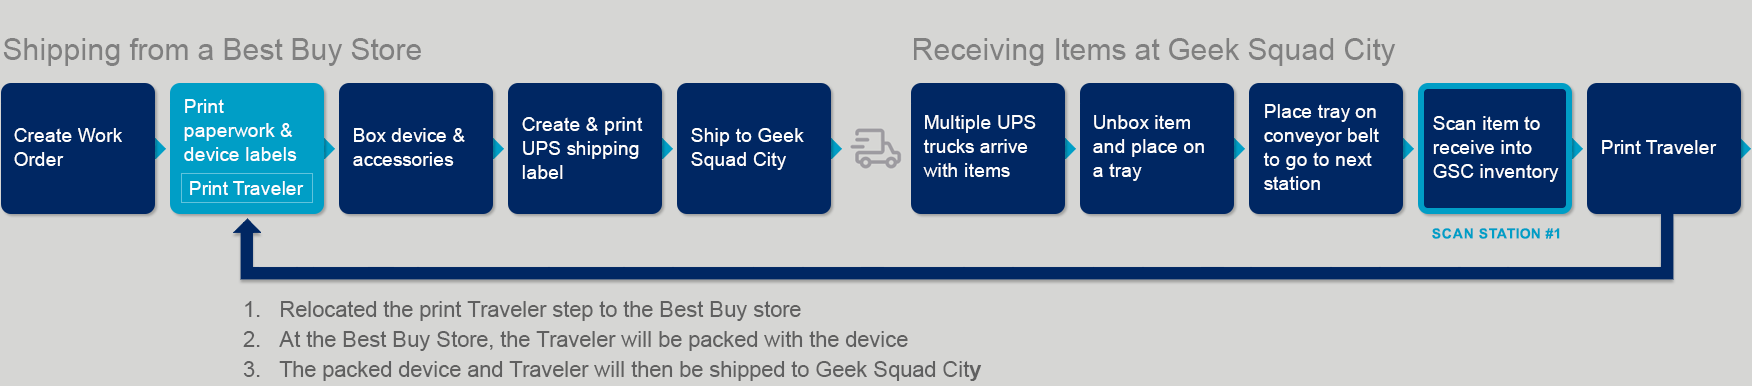
Print the Traveler at the intake location instead of Geek Squad City.
Two wins:
Cheaper — printing moves from the highest-volume point in the network to the lowest, on plain paper instead of expensive label stock.
Less work downstream — the Traveler ships in the box, giving Geek Squad City the option to consolidate a scan station.
The New Flow (Printing a Traveler)
Rather than speed up the warehouse station, we questioned why it had to happen there at all. The store already prints at work-order creation, so the Traveler can ride along at no extra cost and ship inside the box — removing work from the busiest point in the network. That gives Geek Squad City the option to consolidate or drop a scan station.
Getting executive buy-in
Because this changed the physical shipping and receiving process for both local stores and Geek Squad City, the Project Owner and I presented to leadership from both to get approval. I created the flow, the screens, and an interactive wireframe prototype of the new experience to walk them through it — and they approved the change.
New Traveler Design
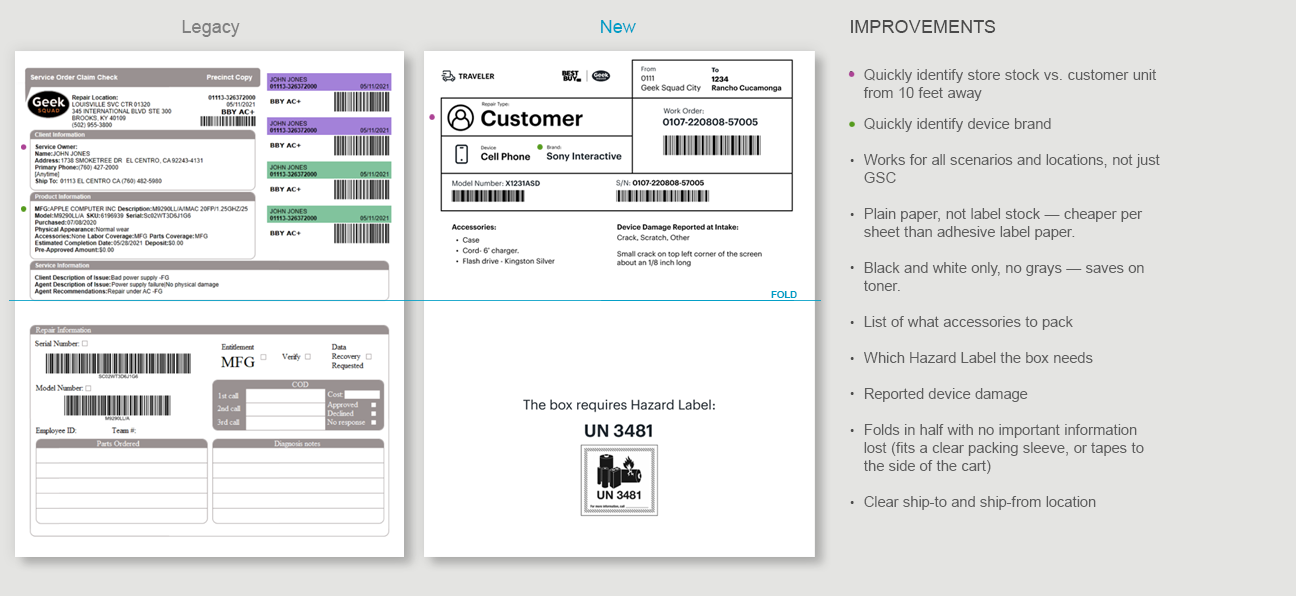
I redesigned the Traveler to do more than meet current needs. My depot research had surfaced a requirement GSC alone wouldn't have: agents there used yellow stickers just to flag customer vs. store-stock devices and needed to read that from across the room. So, I treated "identify stock type and brand from a distance" as a requirement, not a nice-to-have — large type, legible from about 10 feet — and designed one Traveler that works for every location. It also surfaces the accessories to pack and any reported damage, even without a monitor.
Printing the Traveler from Work Order Creation
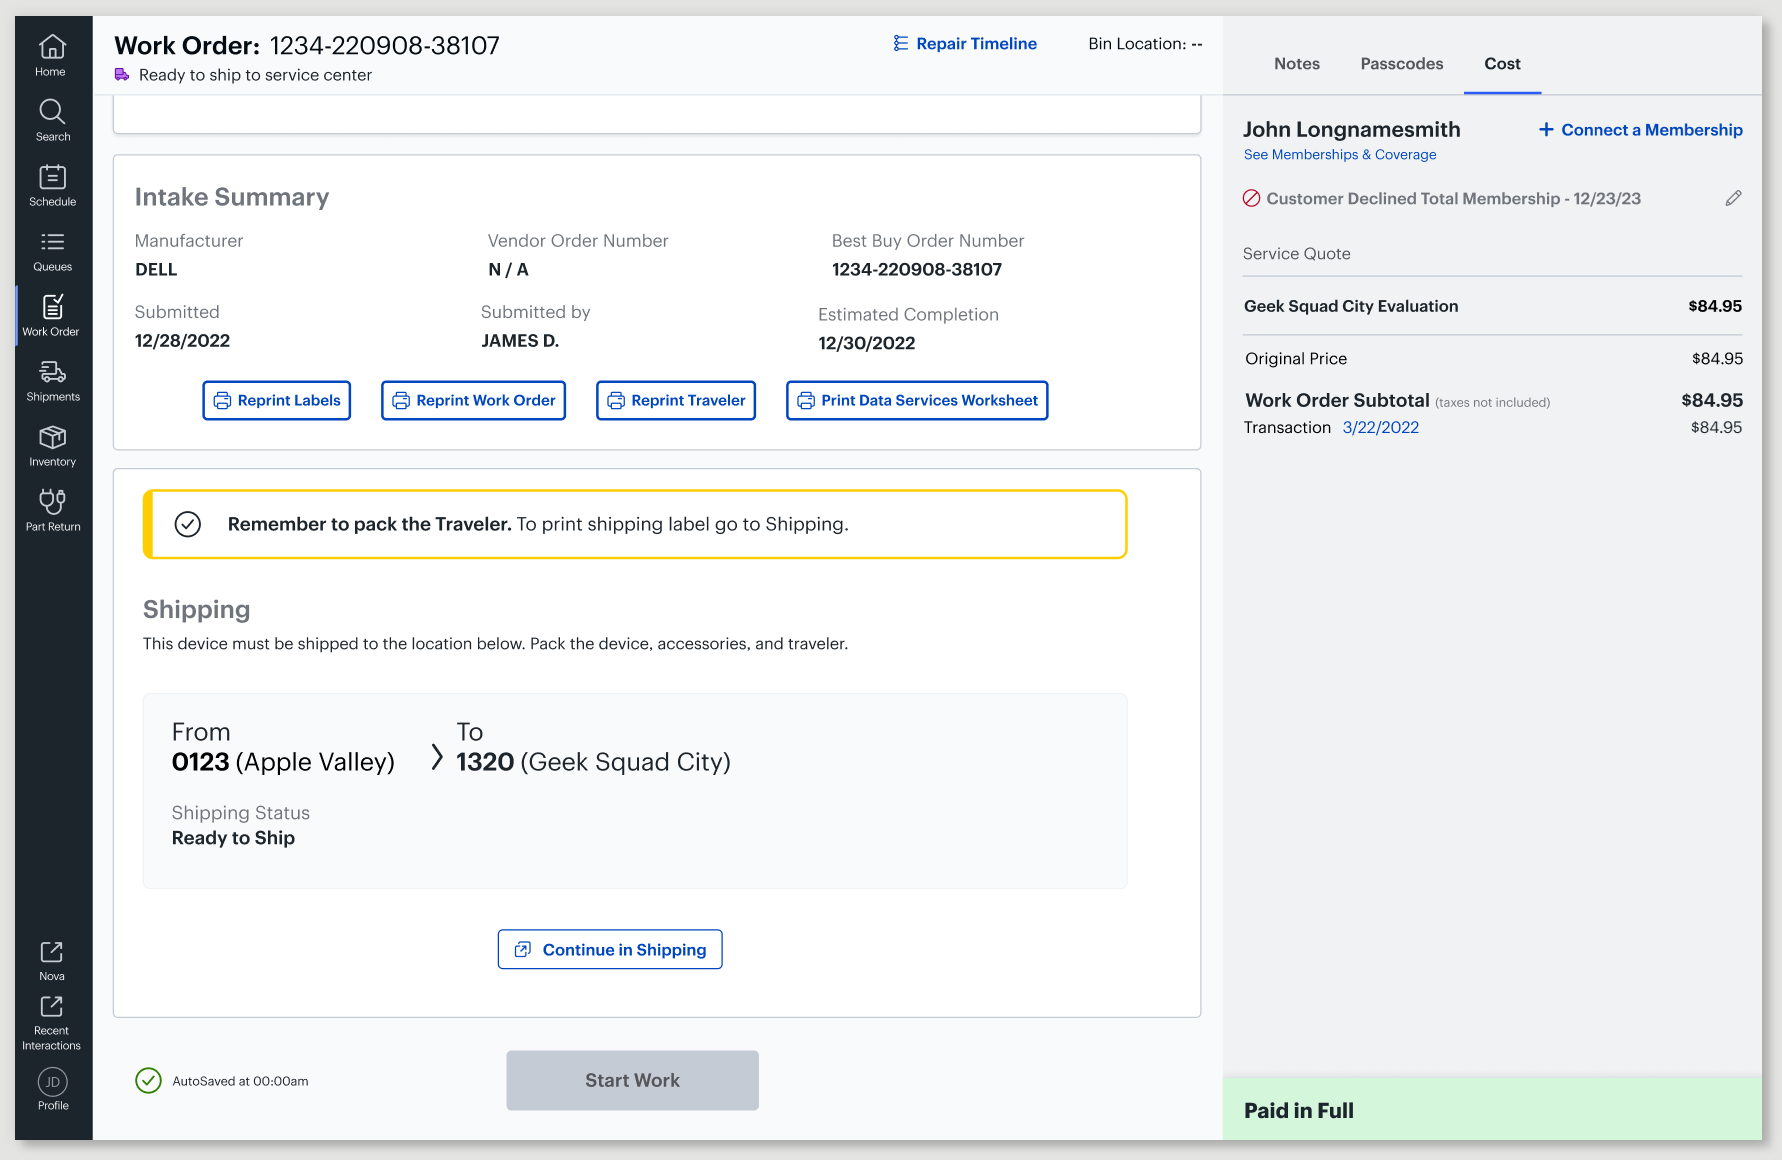
Since the printing of the Traveler was moved to local Best Buy stores, we needed a way to facilitate its printing and notify the agent to ship the device.
Print Traveler
There was already a Finalization step in the Work Order where multiple collaterals print out (labels, work-order copies).
I added the Traveler to that existing step — no new action for the agent.

Shipping Module Created for the Intake Wizard
Moving the Traveler upstream meant agents had to remember to pack it with the device — a new behavior — so I built a guided shipping module to make it automatic.
The reminder "Remember to pack the Traveler" appears inline, and (following our design pattern) the bottom module is the agent's active next step.
The next-action button, "Continue in Shipping," takes them to create and print the UPS shipping label.
Opportunity 2
Can we cut the constant switching between scan gun and mouse — and the number of times an agent handles each device?
SCAN STATION #1
Legacy Receive Interaction
Receiving one item takes multiple steps and constant switching between scan gun and mouse. The biggest flaw: scanning doesn't receive the item — the agent has to press Save to register it. (It also required printing the Traveler, which Solution 1 already eliminated.)

SCAN STATION #2
Legacy Assign to Cart Interaction
Scanning every device on a transit cart, then scanning the bin, forces at least four more switches between scan gun and mouse. Combined with receiving, that's nine handoffs to move one device through the warehouse.

Solution 2
The System Receives the Item and Assigns its Bin, with One Scan.
Previously, receiving and binning happened at two separate stations and took two scans. Now a single scan does both, at one station.
How I Designed the Scanning Experience
Scanning interactions didn't exist in our design system yet, so I built them — every component and pattern for this mode from scratch, with the design-system lead. Three principles drove the work:
Full-screen scan mode. When an agent starts a scanning task, it takes over the whole application — only the left navigation bar stays. There's nothing else on screen to distract from the scan.
Larger fonts. Agents work a few feet from the monitor, so I made the type big enough to read from where they actually stand.
One scan card for everything. I designed one scan-card pattern and reused it across every scanning task, so the experience is the same no matter what they're scanning.
Fewer Mouse and Scan-gun Switches
Beyond combining the two scans, I cut how often agents switch between the scan gun and the mouse. In the legacy system the transit cart was scanned last, so the agent had to use the mouse to activate the next field — the system never knew when they were done scanning work orders. I moved the transit-cart scan to first: there's only one cart, so once it's scanned, the system knows to expect only valid work order numbers and advances on its own. No reaching for the mouse.
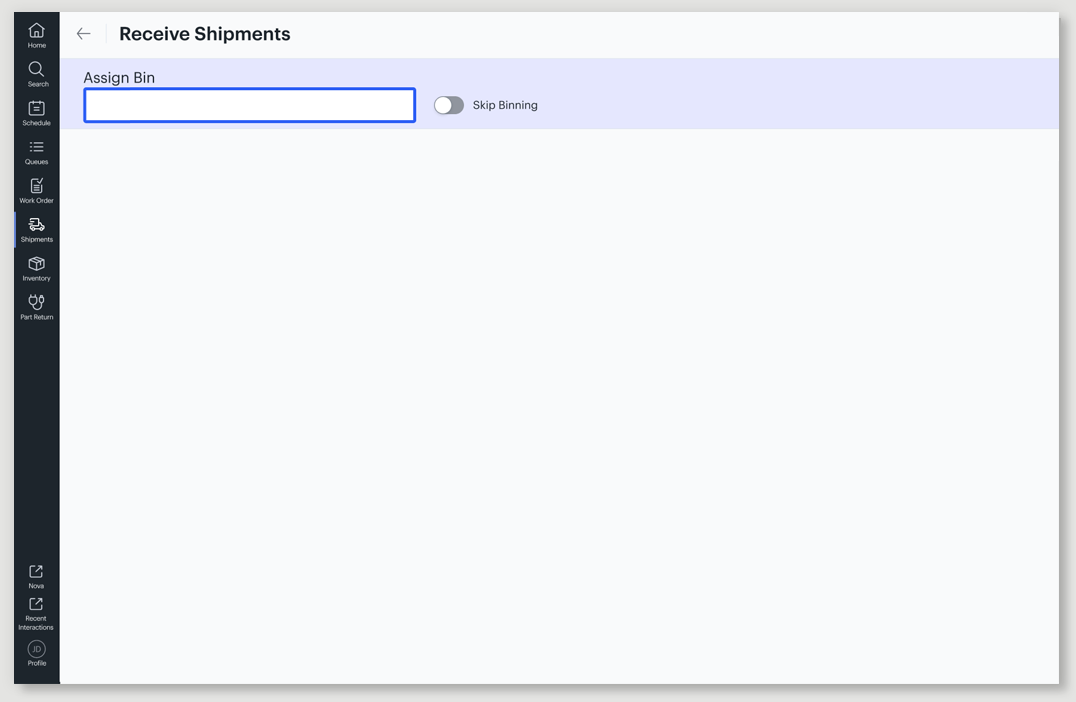
Scan the Transit Cart
First, scan the transit cart. There's only one, so this single scan tells the system to expect work order numbers from here on. Locations that don't bin can flip "Skip Binning" off.
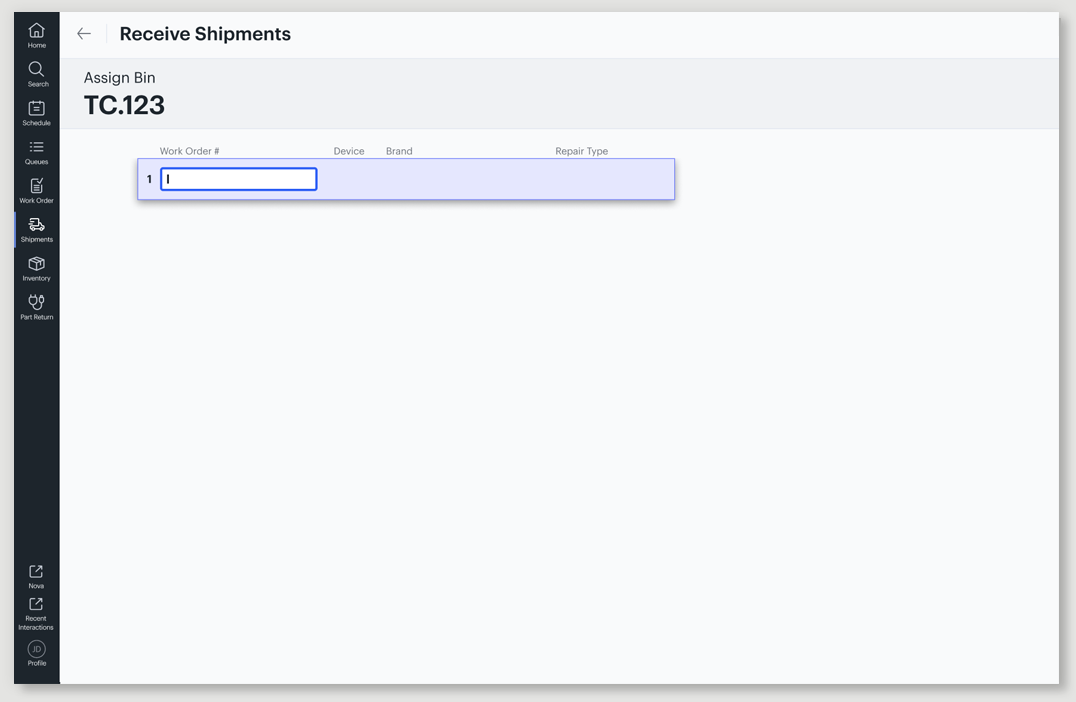
System Ready for Work Orders
With the cart scanned, the field is already active and waiting. The agent goes straight to scanning items — no mouse needed to start.
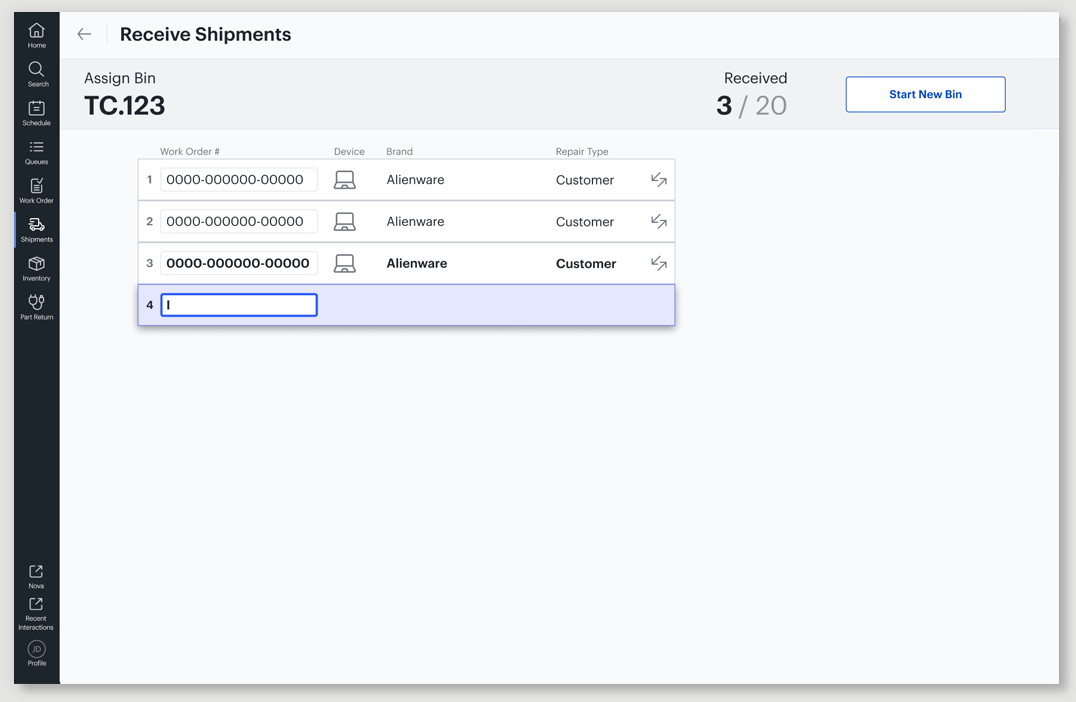
Items Are Scanned and Binned
Each scanned item drops into the list and the active card moves down, with the last scan bolded so the agent can confirm it at a glance. Each card shows repair type and brand — the two things agents sort carts by. This cart holds 20, so the counter shows progress toward 20; other container types, like boxes for parts, use an unlimited count instead.
The List Auto-Scrolls
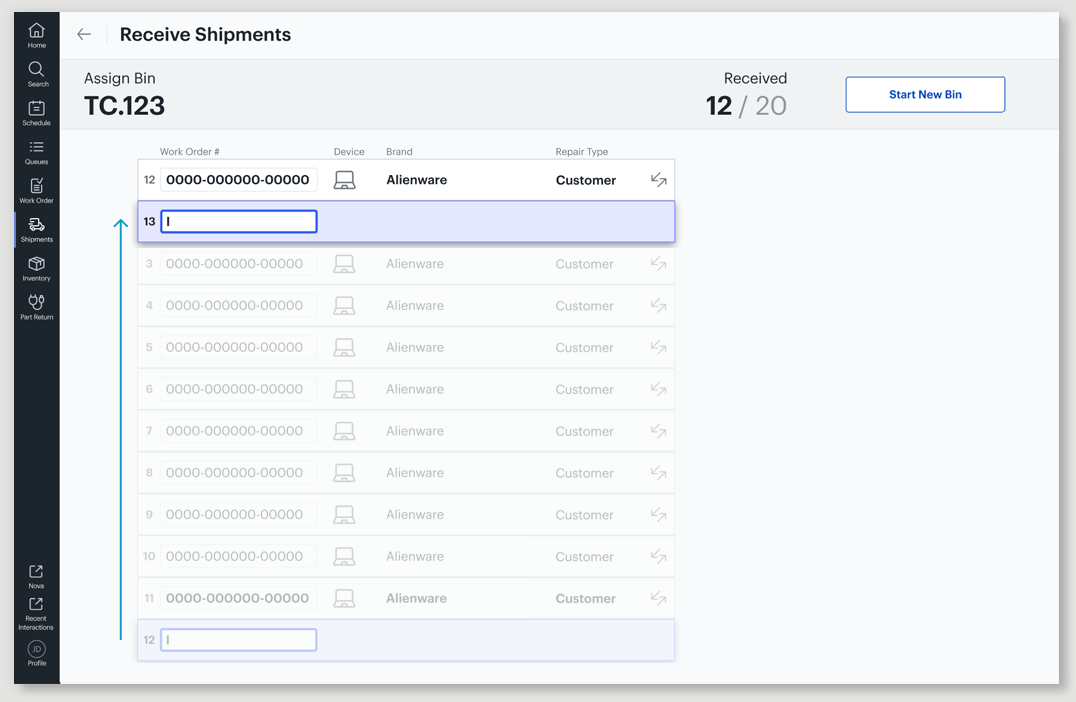
As the list grows past what fits, the view auto-scrolls so the active scan card stays in view — the agent keeps scanning without touching the screen.
Bin Is Full
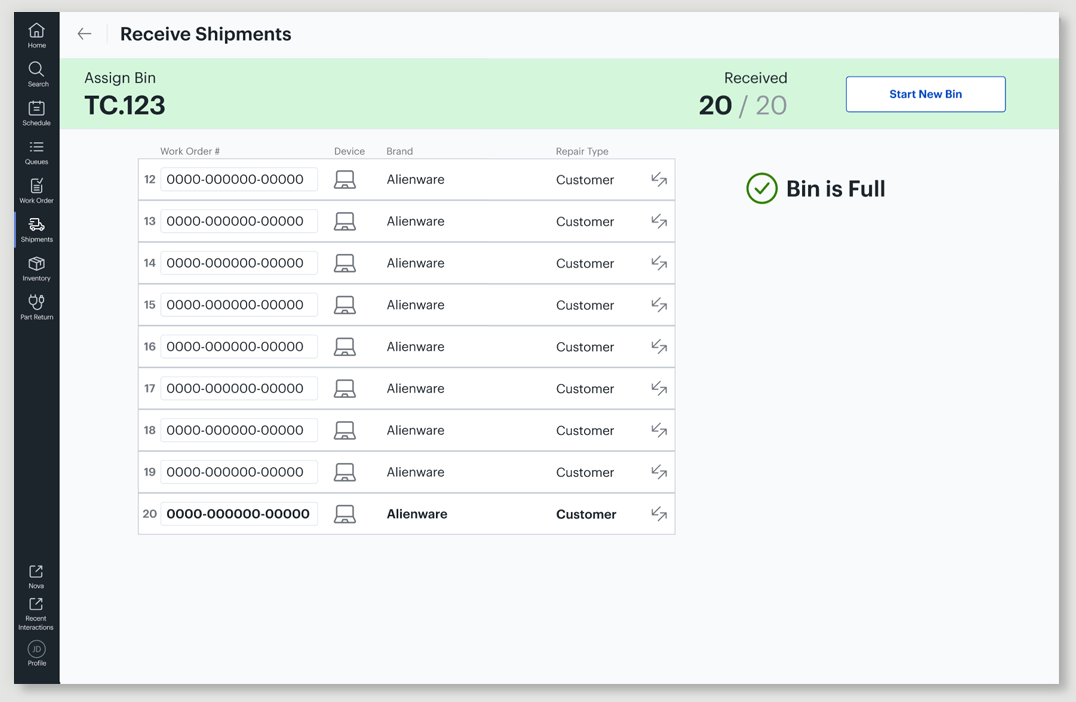
At 20 of 20 the bar turns green to show the cart is full. Because each scan already received and binned the device, there's no Save button at the end — the agent never has to interact with the screen to finish.
Per device, the back-and-forth between scan gun and mouse dropped from 9 interactions to 3.
Approved, Held for a Technical Spike
Barcodes as Buttons
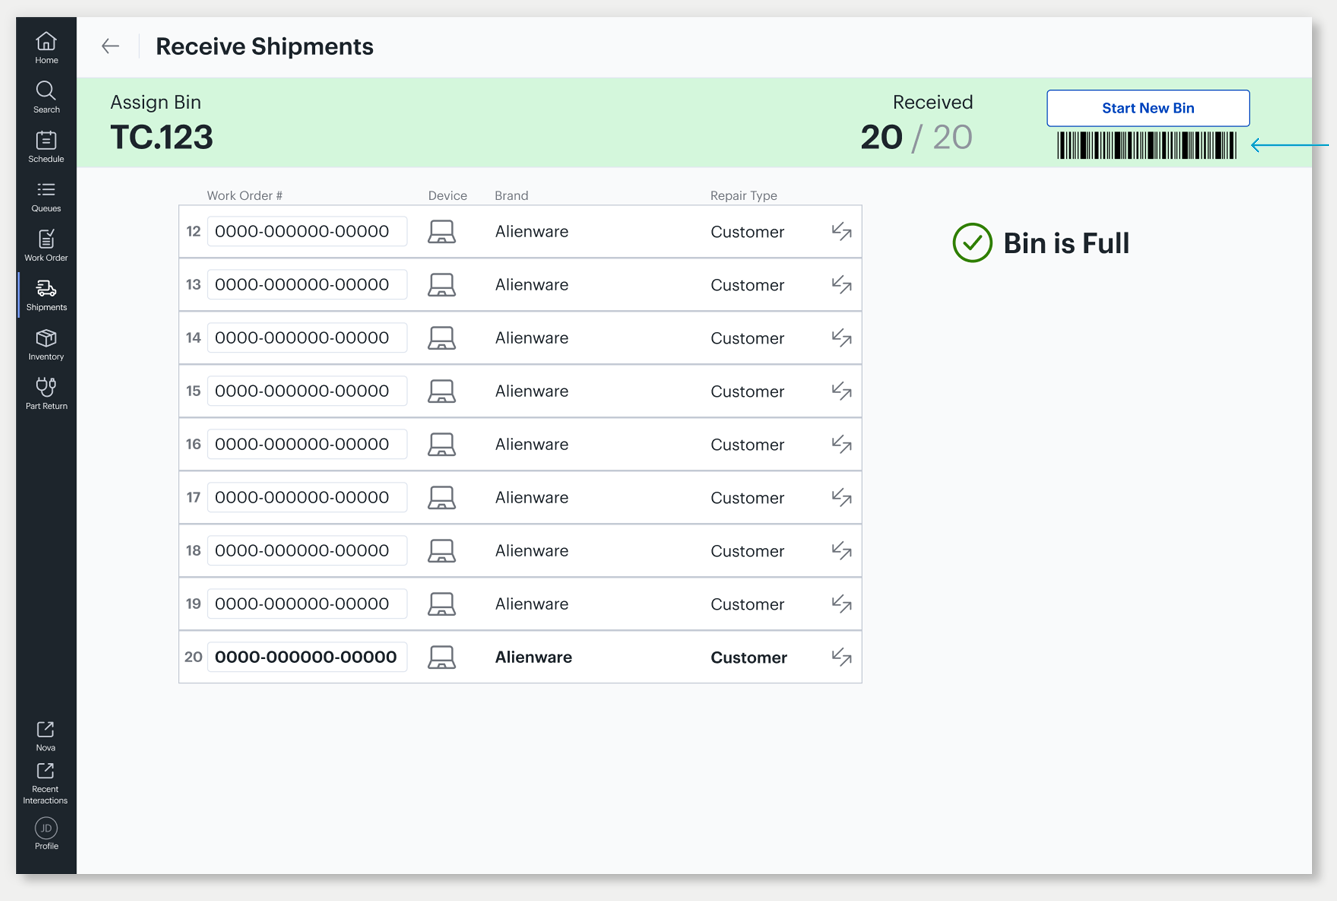
The one place a mouse could still creep in is starting the next bin. I designed an on-screen barcode the agent could scan to open a new bin — no click — extending the same goal of keeping their hands on the scan gun. It was approved, then held for the first release pending an engineering spike: would a scan gun's beam at a few feet hit the right on-screen barcode without catching its neighbors? They scoped a sprint task to test it. I'd rather ship the proven flow and validate the next step than gamble the release.
Explorations
Finding a layout that scales
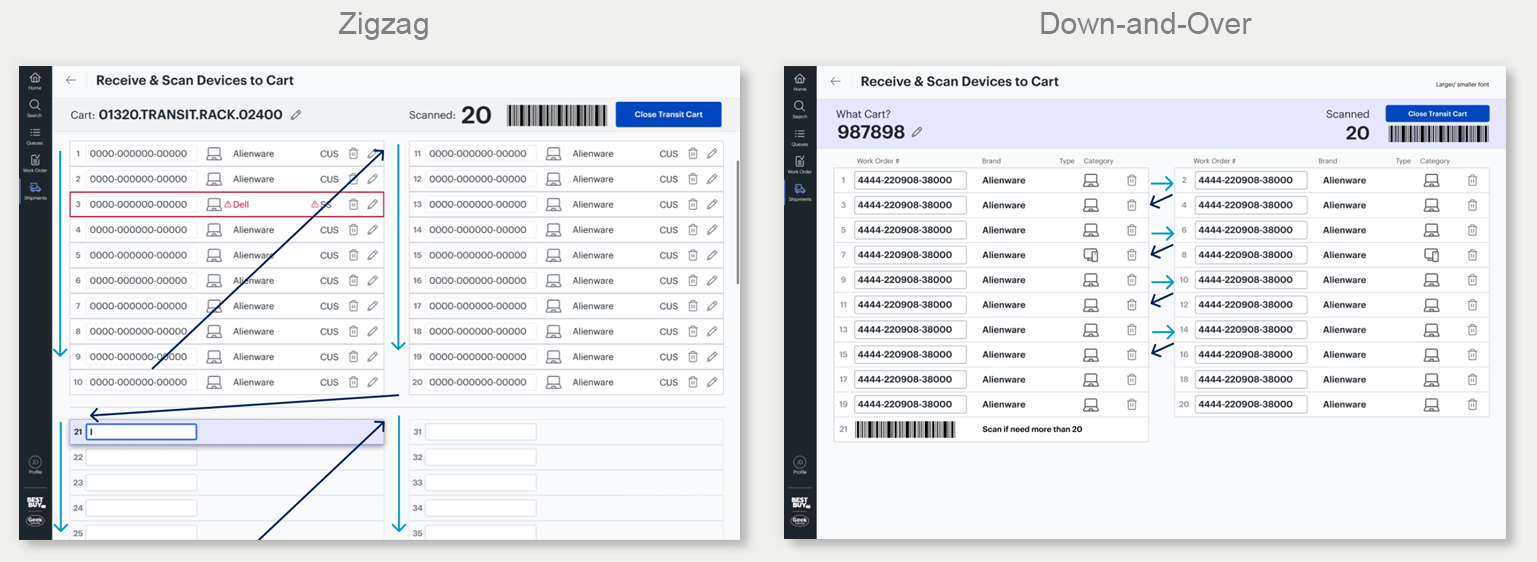
A cart holds 20 trays normally, but I had to design for edge cases — like parts, where a cart could hold hundreds. I first tried to show all 20 compactly in two columns. But how do you handle going beyond 20? I tried different numbering sequences for the columns — zigzag (1 left, 2 right, 3 left…) and down-and-over (1–10 left, 11–20 right) — but neither stayed easy to follow once the list ran long. So as a team we chose a single scrolling list that works in every scenario.
Handling a Wrong Brand on the Cart
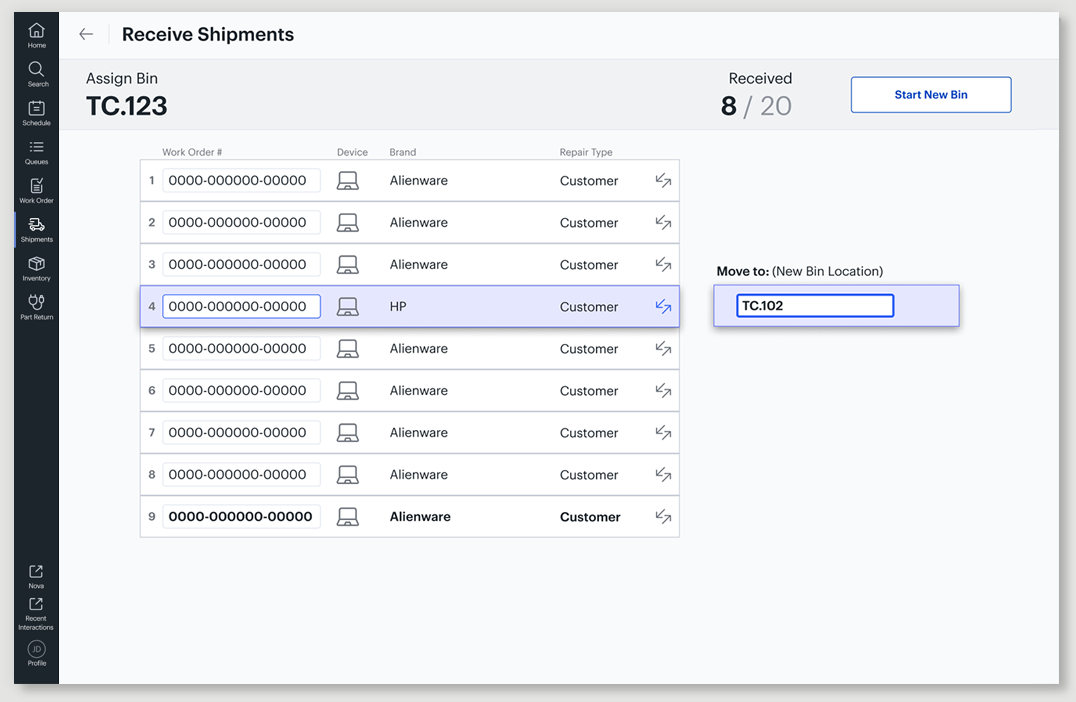
Carts are sorted by repair line — Dell, Alienware, and so on. As a designer, my instinct was to flag a wrong-brand scan as an error, and I designed it that way first. But the stakeholders didn't want it treated as one: brands move between repair lines too often, and the application was new enough that there was nowhere to even store such a list. A wrong brand isn't a blocking error in their process today, so they didn't want the system inventing one. Forcing an error would have meant maintaining a brand list the system couldn't support and the team didn't want — so I designed for the real workflow instead. Since every scan immediately receives and bins the device, the agent still needed a way to fix a misplaced one.
A Move, Not an Error
The brand is shown on every row, so if an agent spots a wrong one — here, an HP unit on an Alienware cart — they can act on it. Every item has a move icon; tapping it opens a "Move to" panel beside that row, where they scan the correct cart and the device moves over, with a confirmation showing where it went.
Handling Errors
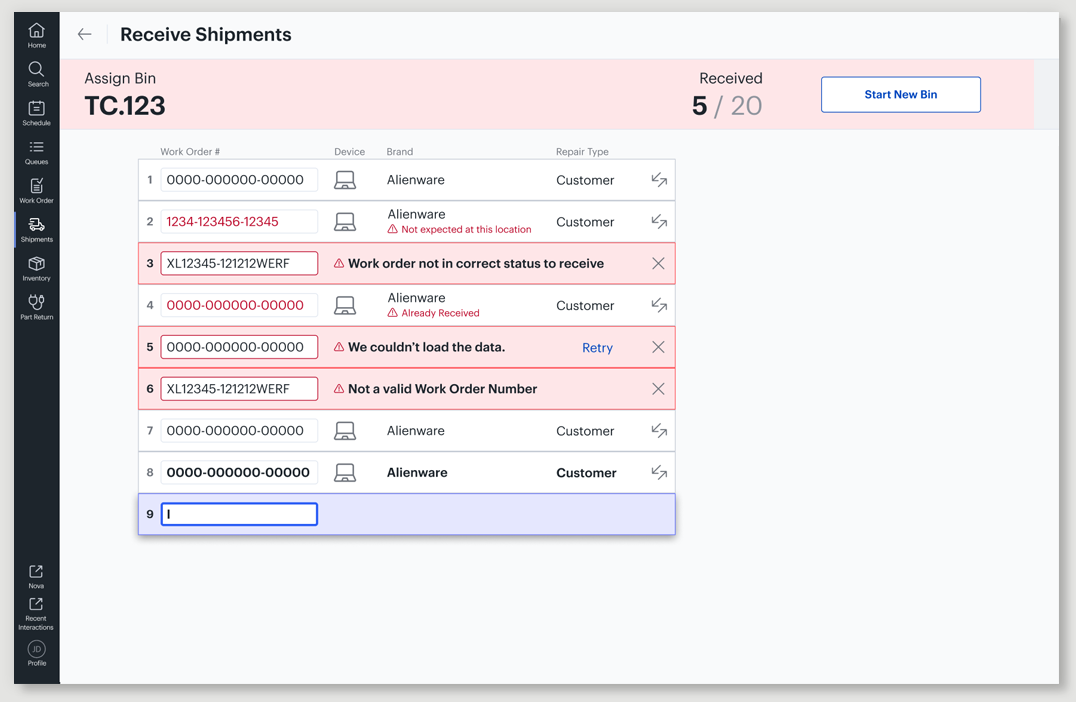
I designed the error states alongside the happy path — wrong location, wrong status, already received, invalid work order, or data that won't load.
A Move, Not an Error
Here, an HP unit was scanned onto an Alienware cart. Instead of blocking it, the system marks the row so the agent can spot it. They tap the move icon, scan the correct cart in the "Move to" field, and the device moves over — with a confirmation showing where it went.
Explore the full flow
The complete interactive flow — including the live scan-card behavior and the Skip Binning option for locations that don't bin — is in the prototype.
Android Handheld Scanners
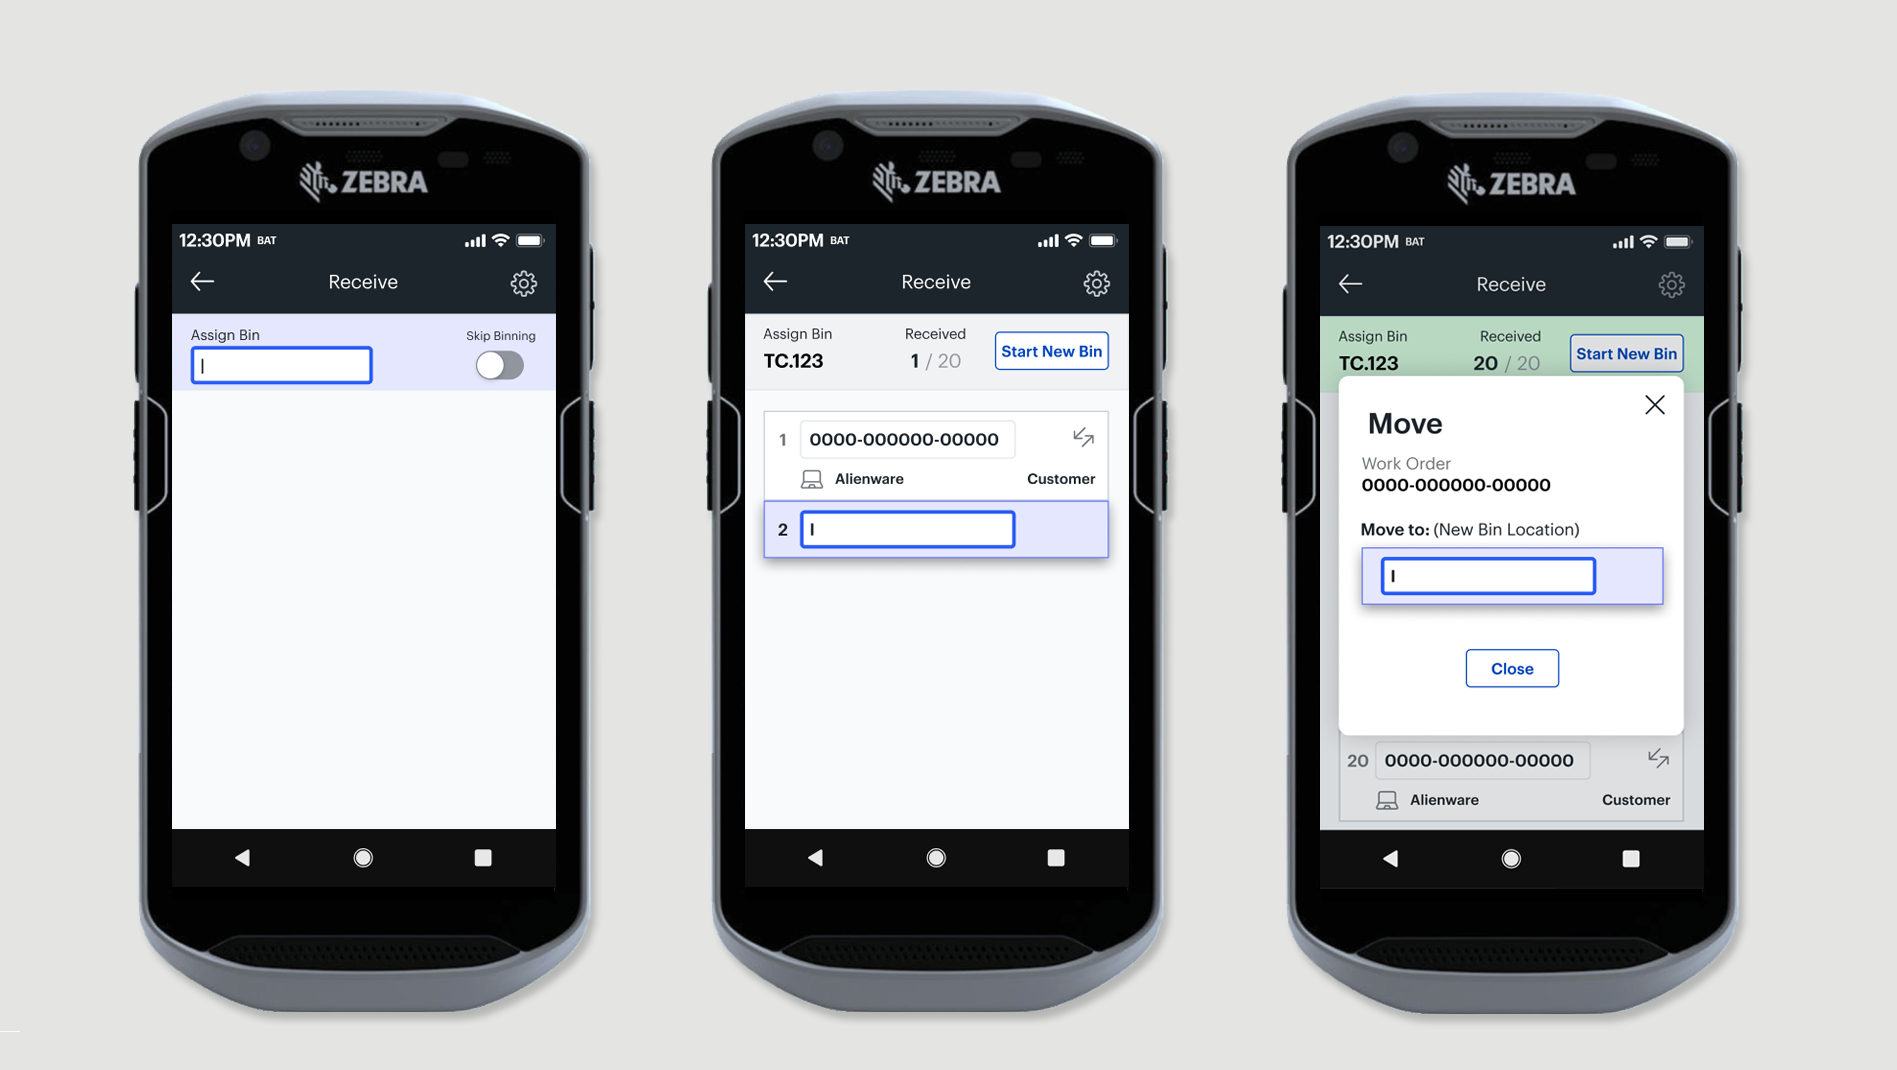
At Geek Squad City agents mostly use scan guns, but other locations use handheld Android scanners (TC-52), so the experience needed a mobile version. Because the scan mode was already full-screen, built on a single scrolling list and one reusable scan card, it carried over to the smaller screen with very little rework — the same patterns just fit.
The Rest of the System
Beyond the core scan flow, the application needed the pieces that hold day-to-day work together — a dashboard for shipping and receiving, reprinting a missing Traveler, label printing, and tracking what's late. Some reuse the same scan patterns; others, like the dashboard and shipment tracking, are their own thing.
Shipments
I created a main Shipments section in the left nav for both incoming and outgoing shipments. Across every dashboard, I kept scanning tasks on the left for consistency.

Receiving Dashboard
Created to assist with resource allocation and give quick access to every receiving task — none of which agents had before.
Modules show how many items arrive today and tomorrow, so teams can plan resourcing.
A view for items still to be received and items past due — finding a missing one used to take weeks.

Shipping Dashboard
Leverages the same pattern and design as the Receiving Dashboard.
Print a Missing Traveler
We needed a way to print a missing Traveler in cases where it wasn't shipped with the device, or simply to allow reprinting

System Waiting for Scan
Reprinting reuses the same scan flow as everything else in the app.

Item Scanned
I wanted a way to queue several Travelers and print them in one press, but the product team worried agents could lose track of which Traveler belonged to which device. For the first release it stays one at a time — a revisit for later.
Print Shipping Label
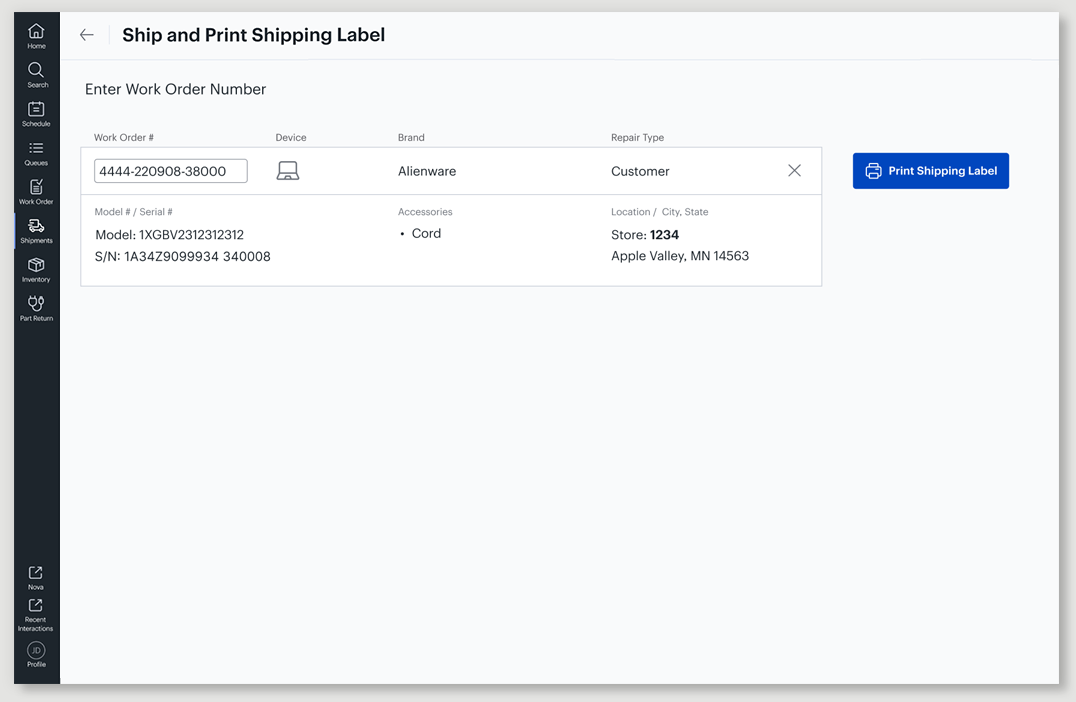
A simple scan to pull a shipping label — enter the work order, and the device's shipping details come up ready to print.

Ship and Print Label - Scan
The scan card carries straight over to shipping — an agent who can receive a device already knows how to ship one.
Print Shipping Label
Once the work order is scanned, only the essential shipping info shows on the card. To keep the scan card consistent everywhere, I kept the extra item details in a separate component below — which also let engineering reuse the same card across every scan scenario instead of building variations.
Aging Shipments

A dedicated section to track aging incoming and outgoing items.
Past Due Deliveries
Surfaces deliveries that are past due, so problems don't sit unnoticed.
Previously, a missing or delayed shipment could go unnoticed for weeks.
I pulled tracking directly into the app, so agents catch issues here instead of leaving to investigate.
Reflection
What the Constraints Taught Me
This project was a lesson in designing well without everything you'd want. I couldn't get on-site at Geek Squad City, so I validated through interviews and on-site research at a comparable depot — and I learned to trust that secondhand picture enough to design from it, while building the flow to be measured later so the gaps could close with real data.
The deadline forced a series of "right for release one" calls — a binning toggle instead of automatic detection, a wrong brand handled as a move instead of a blocking error, an on-screen barcode approved but held for an engineering spike. Each was a deliberate trade: ship the proven flow now, and name the better version for later. Designing under that pressure sharpened how I separate what has to be right at launch from what can be validated and improved after.
It also confirmed something about building on solid patterns. Because the scan mode was full-screen, list-based, and built on one reusable scan card, extending it to a mobile handheld took very little rework — a payoff I didn't plan but got from designing the system to hold together.
What I'd Validate Next
I was reassigned to the Store Inventory App before this build was coded, so the next steps are the ones I designed it to support:
Watch agents use the new flow. Observe the real scanning experience and drill into behaviors — where it's smooth, where they hesitate — and pull comments from the in-app feedback tool.
Find the friction at local stores. The new Traveler step (print it, pack it, ship it) is a new behavior for store agents. I'd interview them about where it breaks down and whether the reminder is enough.
Use data to see who's not shipping the Traveler, and why. A dashboard showing which stores aren't shipping Travelers would surface the problem stores — both to understand the cause and to give management a way to motivate better compliance.
Confirm the on-screen barcode idea. Run the engineering spike on scanning a barcode directly off the screen. If it works, test it with agents to get feedback, then roll it out to a few places to see how it performs in real workflows — and if it lands well, extend it across more of the flow.